

Front-end developers have so many tools to make sense of these days, npm, yarn, bower, grunt, gulp, the list goes on. What happened to the good old days when you could just include a <script> tag of jQuery hosted from some CDN out on the inter web, and just jump right into adding behavior to your HTML to get your app off the ground? Well, you can technically still do that, but it’s not advised if you're writing enterprise software. Today, I’m going to talk about the core concepts of Webpack, and why you should consider using it on your next project.
What’s up Internet? Tom Friedhof here, a solutions architect here at ActiveLAMP. So what the heck is webpack? The webpack docs sum it up saying: webpack is a module bundler for modern JavaScript applications. (https://webpack.js.org/concepts/)
Ok, what’s a module bundler? Before I answer that question let me take you through a scenario of building out a simple web app that requires several other code libraries, like jQuery and Handlebars, to illustrate this point. Lets take a look at “traditional” web app written with jQuery over at todomvc.com. By the way, this is a great website if you’re wanting to test out a new Frontend framework just to see how things works.
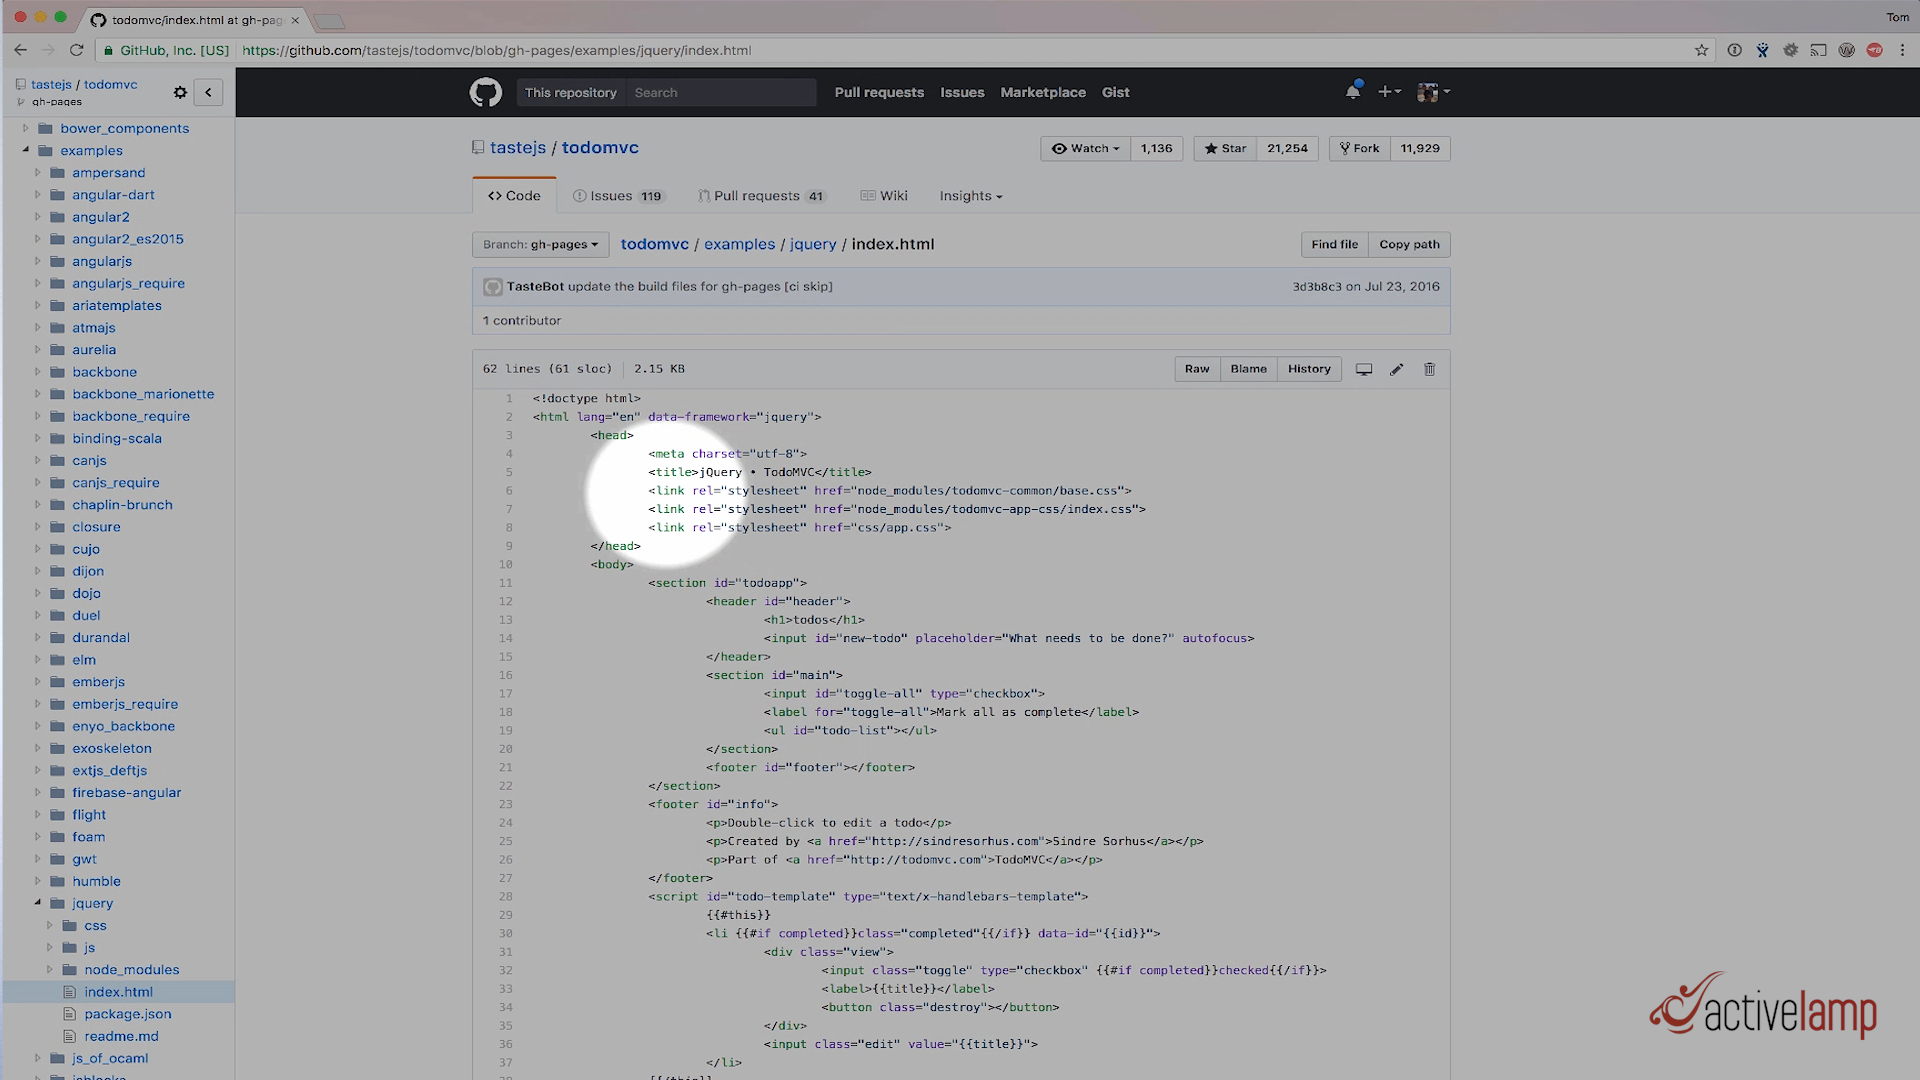
Scroll down to the non-framework section and click on jQuery. We aren’t going to get into how this app was built, we want to look specifically at the source code. Click on Source up here at the top left to head over to their GitHub project. Lets take a look at the index.html file.
You’ll notice at the top of the HTML file they are including 3 CSS files
And if we scroll down to the bottom of the index.html file the app is including 5 JavaScript files.
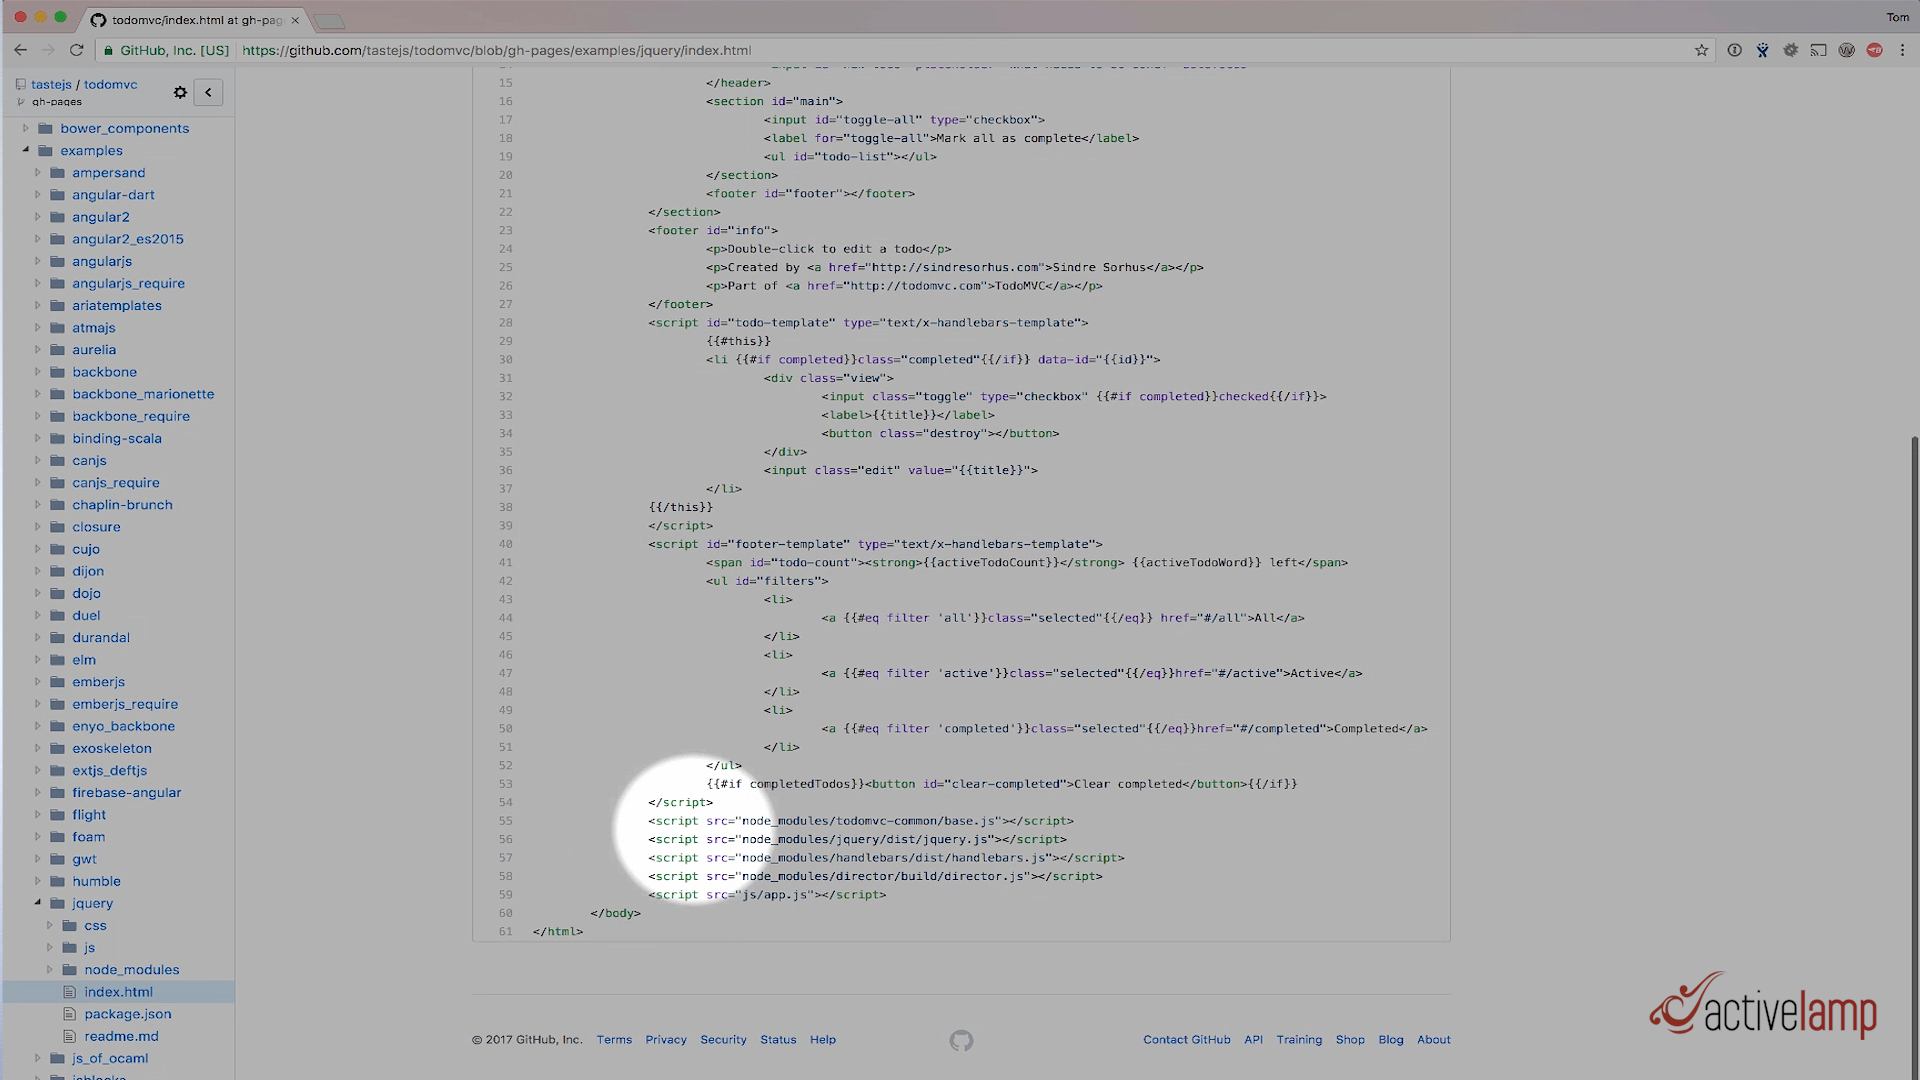
Some of these files come from an external library, and a couple of them are custom, specific to just this app, hence the name app.css and app.js. All of these files are called dependencies.
Building your app this way is perfectly fine, and as you can see on the todomvc.com website, the app works perfectly fine. But this process isn’t optimal for enterprise development. You’ll eventually run into issues if you develop large apps this way.
For example in this app, the 3 CSS and 5 JavaScript files declared in the index.html file add up to 8 separate web requests that each user of your application has to make over the Internet to run your app. More web requests mean that as your app scales to millions of users, you could potentially need more servers to serve your app to handle that load.
Another thing to consider is that as you build an app that has more than a few dependencies, source order matters in your index.html file. You must ensure that the order your <script> tags are in are correct, so that any javascript that is dependent in other javascript files are listed first. A library like jQuery must be listed first so that it is available in later scripts. You can’t list the app.js <script> tag before the jQuery.js <script> tag if you plan to use jQuery in your app.js file. The browser won’t know what jQuery is yet.
This is where webpack enters the picture. Using a tool like webpack helps you overcome issues like what I just mentioned when building large apps, and it brings with it a whole other slew of efficiencies that you’ll gain, and benefit from, like Uglifying your JS, compiling your SASS, bundling libraries that never change into separate DLL’s, dynamically linked libraries, and so on. But I’ve digress, let me get back to the original question, what is a bundle?
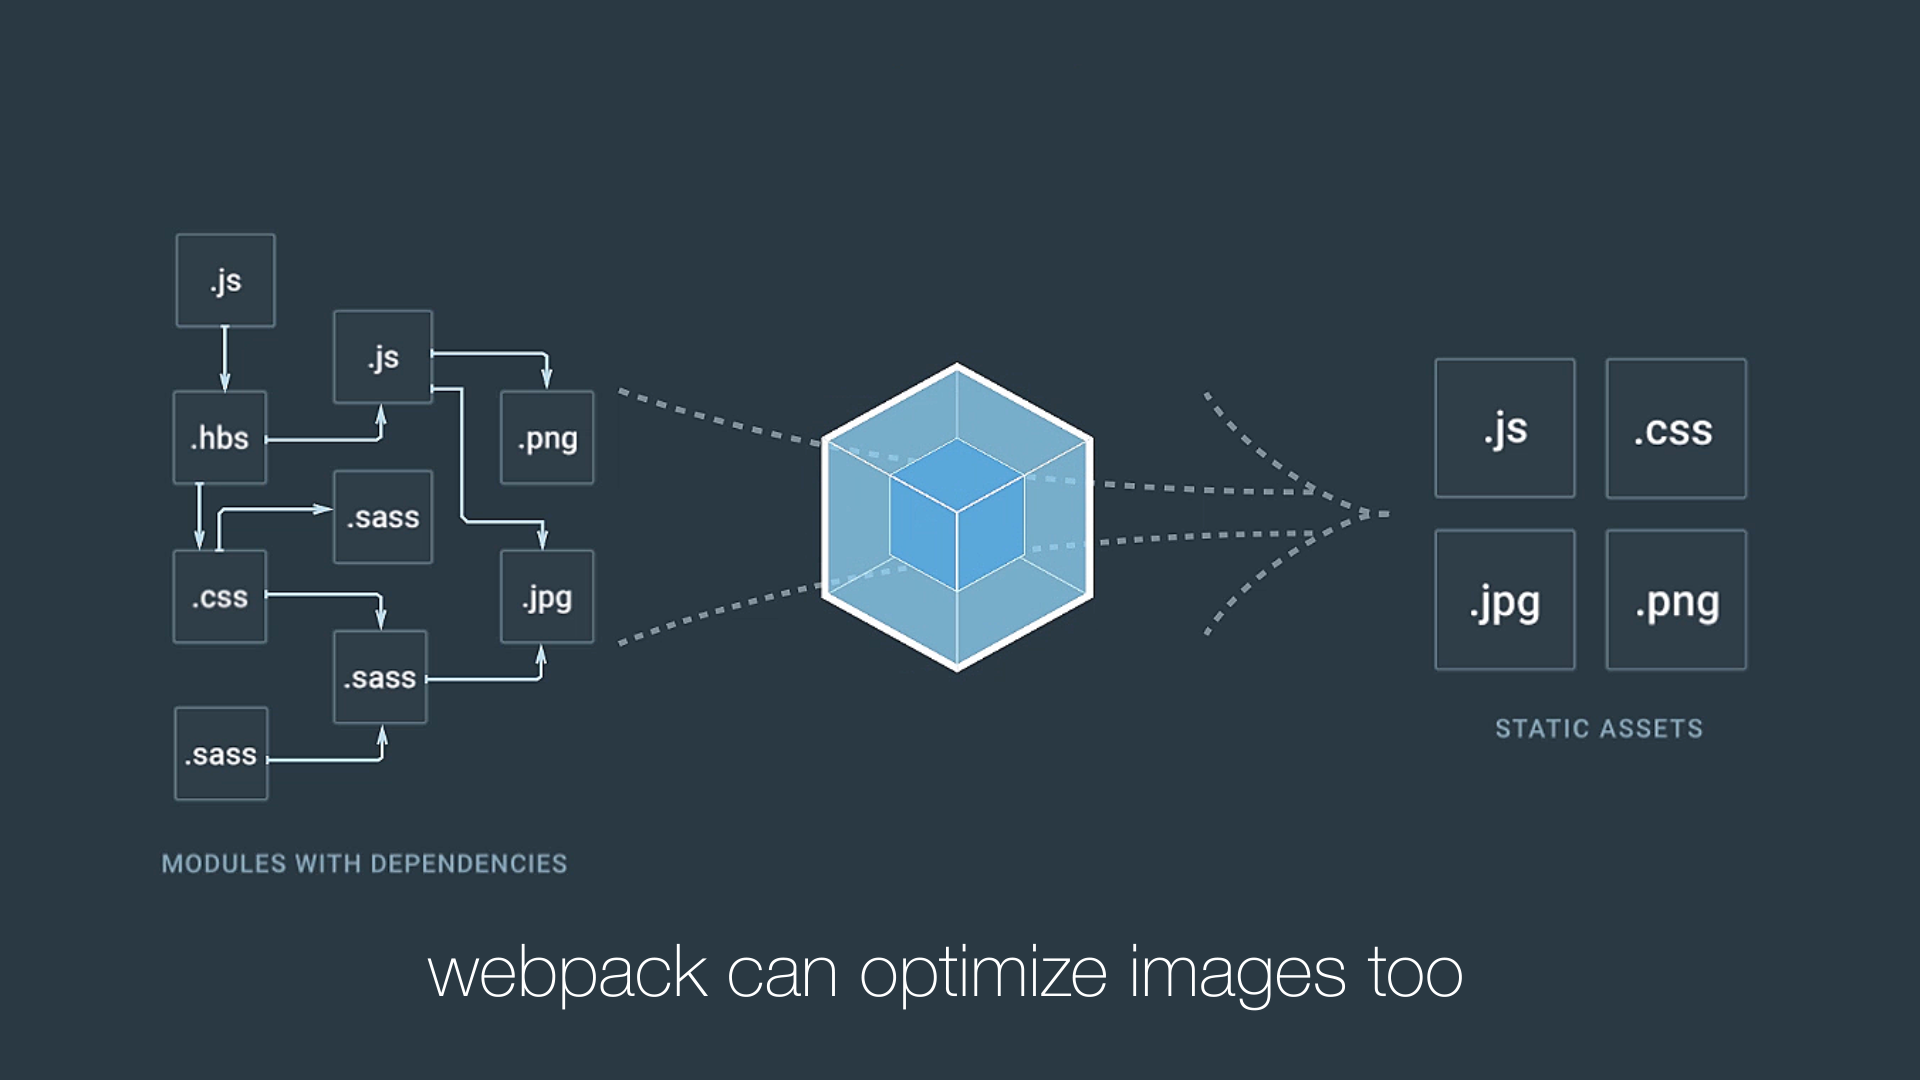
If we go back to the webpack docs, it gives us a hint: webpack recursively builds a dependency graph and packages them into a bundle.
Essentially, what webpack does is take an entry file, for example the app.js file of your app, it reads that file and finds all of the dependencies listed in that file. Webpack will interpret the import and require statements in this main entry file, find all of the files that is imported or required, and package them up into one output file, called a bundle, that you would include in your index.html file.
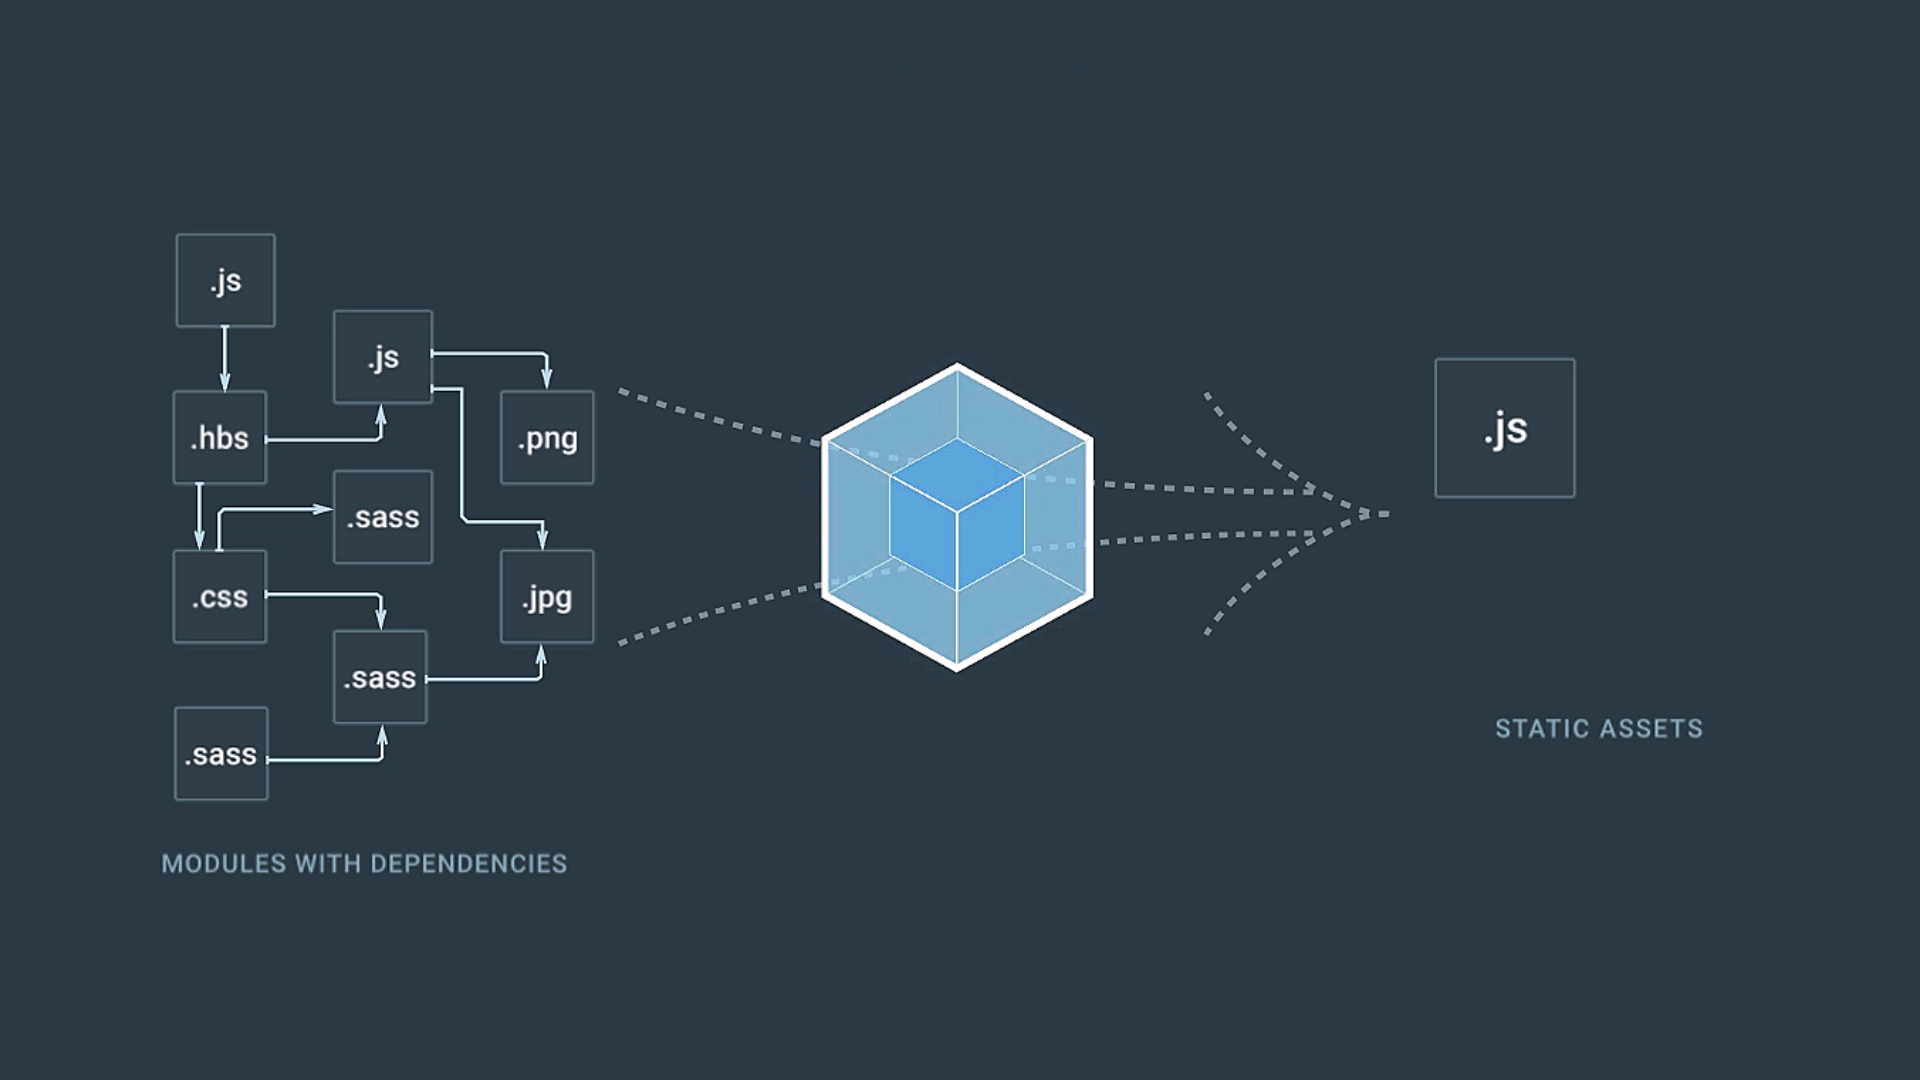
The 3 CSS Files and 5 Javascript files that I mentioned earlier get packaged into one Javascript bundle, that you could include in your index.html file.
That is the essence of bundler, and webpack. Also, webpack not only grabs Javascript dependencies, but also HTML files, CSS files, Images, Text files you name it. Any dependency you specify with a require()orimport statement can be processed by webpack. Behind the scenes it takes these other file types and turns them into Javascript using what webpack calls a loader. Loaders in webpack transform different file types into Javascript, so that it can then bundle the dependency into one output file.
I just covered 3 of the 4 core concepts of webpack. We talked about Entry, the initial file to read in. We talked about Output, the bundle file to create with all of the dependencies packaged in one file. We talked about Loaders, the ability to transform some file into Javascript, whether that be Typescript to Javascript with the ts-loader, or turning CSS into JavaScript using the css-loader.
The last core concept is plugins. Plugins in webpack process each chunk of JavaScript, so that you can hook in and do something during the compilation process. We only specified one entry point, so we only have one chunk. To explain what a webpack plugin is, I’ll describe the functionality of some common webpack plugins.
When developing your app, you’ll likely use is the ExtractTextPlugin, to pull the CSS out of the bundled Javascript and create a separate CSS file. This is recommended so that the CSS can be cached separately from the Javascript in users browsers.
Another common plugin is the HtmlWebpackPlugin, which creates an index.html file for you, and automatically inserts the bundled CSS and Javascript into the index.html file for you. Plugins allow you to do stuff to the JavaScript application while it is being compiled.
Let’s convert this ToDoMVC app to use webpack and see all four of these concepts in action.
So here we are again on TodoMVC.com. We're going convert this jQuery version of the app. And so let's go grab the source code. So if you're following along at home, you can clone this repository, which I have done already here. We're looking at just the jQuery directory here. You're likely going to have to clone the root of this repository and then go straight into the jQuery directory that we're in.
But you can see here, the index and HTML file, with the three CSS files up top and the five JS files down at the bottom. Or here in my text editor were the three up top and the five at the bottom.
And so to do this webpack conversion, I've actually already made the webpack conversion. I've got it on a different branch, just so I can quickly show you how this is done. So I'm going to check out that branch. It's called the webpack conversion.
What that will do is that will update my index.html file, and essentially that's taken out the three CSS files and the five JavaScript files. Let's actually look at the diff for this, so we can look a little bit closer.
And so if I look to see what's different between this webpack conversion branch that I'm on and the master branch, which is up on GitHub, we can see in the index file that we have in fact removed the three CSS files that were left here. And then down here, we have removed the five JavaScript files down here.
And so if we open up app.js, we basically included all of our dependencies in this one file, in this entry file app.js. And so you can see here, jQuery Handlebars which used to be declared globally in the index.html file down here is now declared specifically in this app.js file. It's no longer in the global name space. It's only available only within this app.js file.
And we're using the require syntax, which that's what webpack actually looks at. It looks at require and import statements to be able to discern what's in the dependency tree that it will create.
And so you can see we're requiring Handlebars, the minified version of it. We're requiring the base-js file. We're requiring jQuery. We're requiring the router instance from the director. And then we're also requiring those three CSS files that we had in the index.html file.
So essentially, what we did is we just took all of the dependencies that were in this HTML File and we moved it to the actual JavaScript application. We didn't change anything else in this application. And if I go over to package.json, there are a couple more dependencies that we need for this application, specifically for webpack. And so the CSS loader, the Extract Text webpack plugin, the HTML webpack plugin, the style loader. We need webpack itself, and then you don't need the webpack Dev Server, but it is nice to use when you're developing with webpack. And so those are our new dependencies that we need with our NPM install.
And then the one file that does all the magic is this webpack.config.js. And this is what actually holds the four concepts that I was talking about earlier, and so we talked about an entry file, we talked an output file, and then we talked about loaders, and we talked about plugins. And so essentially, what webpack will do when we actually run the webpack command, is it's going to look for our entry file, which is defined as js/app.js and it's going to output a bundle.js in our /dist directory.
And so if I come back to our code editor and go into js/app.js, you can see here are the dependencies that we've declared in this app.js file. And if I come down here and I run webpack in terminal, what it will do is it will create a /dist directory.
And it will take all of these dependencies and bundle it into a bundle.js file. And so if we were to look for, say for example, some of our CSS, let's look for the footer selector. So you can see, here is our CSS file that we've imported, and it's basically a JavaScript module now.
And so if we want to see this actually running in the browser, we can run the webpack dev server. And that'll create a server at localhost 8000 or 8080. And let's go here and see what that looks like.
And so here is our Todos app. It works just as it did before. And I can mark these as complete. I can see what's active, what's completed. I can clear completed ... check this off, clear completed. And so the app works just as it did before, except that if we look at our HTML here, the only thing that is getting included is this one bundle.js file. All the CSS, you can see we don't have a link tag up here at the top. It's all bundled within this one bundle.js file.
Now as I mentioned earlier, you really want to have your CSS file as a static file that's actually linked in the head, so that your JavaScript and your CSS can be cached separately. And so that's where the plugins come into play. And so let's go back to PhpStorm again real quick.
Before I show the different plugins, let me just kind of explain what's going on here in this webpack config file. And so we already talked about the entry file, which it looks at this app.js file within the js directory. And then it outputs a bundle.js file in the /dist directory.
Where does this index.html file come from? Well, this is where plugins come into play. And so we have a plugin down here called The HTML Webpack plugin. And essentially what this does is this creates an index.html file for you. And you can pass it options, saying which template you want to use for that index.html. If you wanted to use the default markup the plugin gives you, you could just do this and not pass it any options, and it will create a default index.html file and automatically insert the bundle that you're creating into that. But for our specific case, we actually want to use a template index.html because that has the actual templates needed to run this, to do application. And so in webpack config, we're basically saying, "Create an index.html file for us, and use this template for the index.html file."
And so that's what plugins are. We're going to see another plugin here in a second. But before we move on, I want to talk about loaders. Again, loaders are what allow webpack to convert certain types of files to JavaScript. And so basically, what we're doing here is we're telling webpack to listen for any file with a .css extension on it. So if we require any .css files or import .css files, it's going to be passed through these two loaders. And so we have a CSS loader defined here, and then we have a style-loader defined here.
And essentially, what it's going to do--let me go to my app.js file--is it's going to see that I have three require statements that actually match that regular expression that we saw earlier. It's got the .css extension. What it's going to do is it's going to take that file and pass it through the two loaders that we have specified. So first, it's going to take that CSS and take the CSS, convert it to JavaScript, and then it's going to take that converted CSS and turn it into an actual style tag that would be placed on your page.
So if we're to look at what this looks like through the console, so now I'm going to inspect this application and I go into my head tag up here. You can see there are three style tags of all of the CSS that we're importing. And so you can see the three style tags correspond to the three files that we've specified here: the base.css, index and app.css.
And so we go back to this. The app.css was very minimal, so you can see that in fact, the CSS where app.css is being injected into the page with this style tag.
So let's go back to the webpack config file. Okay, and so again, before we move on, just to review, we have the entry, which is the file that we're entering the application on to find all the dependencies. With the output, we're defining what file we want to output all the dependencies in as a bundle, so we're saying, "Bundle that JS and put it in the dist directory." In our file system, we're specifying loaders, how we want to handle files that are imported or required in our application when it matches this regular expression. We want it to go through a CSS loader, and then a style loader, and then we're specifying a plugin. We basically want to create an index.html file, and use the template index.html.
So now let's move on to the next plugin that I want to show, which is the Extract Text plugin. I'm going to stop this webpack Dev Server. And what I was saying earlier is you don't really want to have your CSS bundled with your JavaScript. It's better to have your CSS as a separate CSS file, so that it can be cached separately from your JavaScript, and so that's what we're going to do now.
I'm going to check out the webpack Extract Text plugin branch. And so now if we look at this webpack config file again, so now we were requiring another plugin called the Extract Text plugin. And you can see that we've changed this loader a little bit, and we also added a new plugin to the plugins array called the Extract Text plugin. And we passed it a parameter: styles.css which is the file name that we want to output when the CSS is created.
And so if we do a diff of this compared to the other branch, you can see this is what we changed. We basically said, "Instead of using the style loader and CSS loader directly, instead when you come across a require for a CSS file or an import for a CSS file, use the Extract Text plugin, and specifically use the CSS loader. And if that doesn't work, fall back to the style loader." And what this plugin will do is it'll basically take the CSS from the chunks, the JavaScript chunks that we talked about, and write it to a file called styles.css.
And so that's the only thing that we've changed here. It's just this one plugin. And so let's go back to our editor and run webpack. And so now if we go into where dist directory here, you're going to see that it created this one file, styles.css. So it took all three of those files and basically created one styles.css file for you. And if we go into our index.html file, you can now see up here in the head tag, there is now a link tag referring to this styles.css file.
And what's neat about this is behind the scenes, this HTML webpack plugin is actually working with this Extract Text plugin and the HTML webpack plugin is inserting the link tag for us for the actual styles.
Let's take a look at what this looks like in the browser. And so it's from the Dev Server. All right. And so now, we're back in the Dev Server. Everything should work as it was before. And so here is all of our tasks. Let's mark one complete. So we have one active, one complete. And if we go into the console and open up the head tag, you can now see that it is linking to that style.css file.
So just to recap again, the core concepts of webpack is you have an entry file, you have an output file, you have loaders, and in this case we're using a specific plugin to process any import or requires with a CSS file, and then we have a plugins array which is any plugins that we want to use in our webpack configuration. We put it into this array as well as import it up top, and that's what actually works on your JavaScript chunks as things are being compiled with webpack.
Subscribe on YouTube
We update the channel regularly with the latest client work and special event videos.
Authored by


Tom Friedhof
Senior Software Engineer